Hashicorp Nomad
Site officiel : nomadproject.io
Nomad est un orchestrateur de conteneurs et d’applications (Docker, binaries, VM, etc.) open-source, conçu pour être simple, léger et multi-cloud. Il permet de déployer, scaler et surveiller des workloads hétérogènes sans la complexité de Kubernetes.
Points forts :
- Supporte des applications conteneurisées et non conteneurisées.
- Intégration native avec Consul (réseau) et Vault (secrets).
Comparaison avec d’Autres Orchestrateurs
| Fonctionnalité | Nomad | Kubernetes | Docker Swarm |
|---|---|---|---|
| Complexité | Faible | Élevée | Moyenne |
| Workloads Supportés | Multiples (Docker, Java, binaries, etc.) | Conteneurs uniquement | Conteneurs uniquement |
| Installation | Rapide (<5 min) | Longue | Rapide |
| Intégration Ecosysteme | Consul, Vault, Terraform | Helm, Prometheus, Istio | Docker Compose |
| Scaling Automatique | Oui | Oui (via HPA) | Limité |
| Cas d’Usage Typique | Multi-cloud, workloads hétérogènes | Microservices complexes | Petits clusters Docker |
Architecture
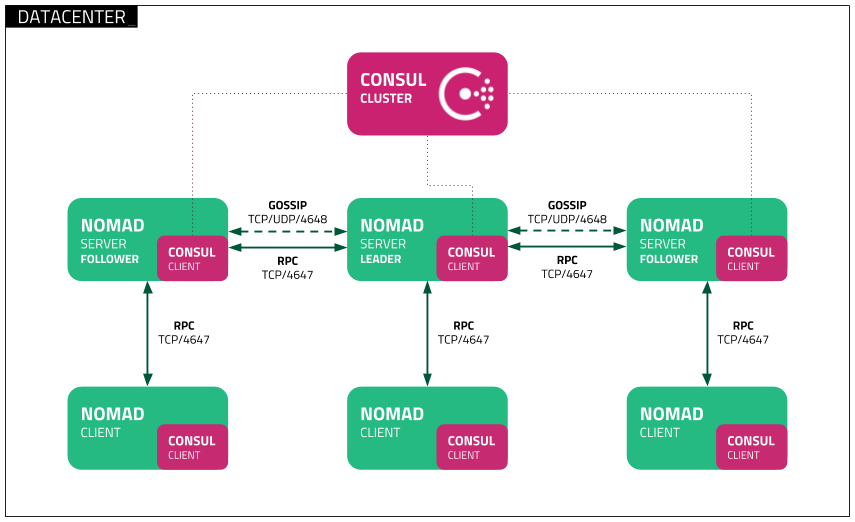
Composants Clés :
Serveurs Nomad :
- Gèrent les jobs, le scheduling et l’état du cluster.
- Mode HA (High Availability) possible avec un cluster de 3 à 5 serveurs.
Clients Nomad :
- Exécutent les tâches sur les nœuds worker.
- Communiquent avec les serveurs pour rapporter l’état des tâches.
Intégrations :
- Consul : Découverte de services et santé des applications.
- Vault : Gestion des secrets et chiffrement.
Déploiement mono serveur
Suivre la documentation d'installation rapide et celle de déploiement d'un cluster local sur le site de Nomad.
# Installation

wget https://releases.hashicorp.com/nomad/1.9.5/nomad_1.9.5_linux_amd64.zip
unzip nomad_1.9.5_linux_amd64.zip
sudo chown root:root nomad
sudo mv nomad /usr/local/bin/
nomad

nomad --version

nomad -autocomplete-install

# Récupération du projet de démo
git clone https://github.com/hashicorp-education/learn-nomad-getting-started
cd learn-nomad-getting-started
git checkout -b nomad-getting-started v1.1

# Lancement d'un noeud unique local
sudo nomad agent -dev \
  -bind 0.0.0.0 \
  -network-interface='{{ GetDefaultInterfaces | attr "name" }}'
export NOMAD_ADDR=http://localhost:4646

# Depuis un autre terminal vérifier avec
nomad node status

# Visiter la page sur pour l'interface
curl http://nom.DNS.du.virtual.lab:4646/ui/jobs


# Lancer un premier job
cd jobs
export NOMAD_ADDR=http://localhost:4646
cat pytechco-redis.nomad.hcl
nomad job run pytechco-redis.nomad.hcl

# Aller vérifier dans l'interface de nomad et
docker ps

# Démarrer l'appli web
cat pytechco-web.nomad.hcl
nomad job run pytechco-web.nomad.hcl
docker ps
curl http://nom.DNS.du.virtual.lab:5000

# Démarrer le job de type batch et lancer sa première exécution
cat pytechco-setup.nomad.hcl
nomad job run pytechco-setup.nomad.hcl
nomad job dispatch -meta budget="200" pytechco-setup
nomad job status pytechco-setup

# Visiter l'interface de Nomad

# Démarrer le batch pour de type CRON
cat  pytechco-employee.nomad.hcl
nomad job run pytechco-employee.nomad.hcl

# Visiter l'interface de Nomad

# Visiter l'interface de l'application

# Arrêter le CRON et relancer le batch manuel
nomad job stop -purge pytechco-employee
nomad job dispatch -meta budget="500" pytechco-setup

# Editer le job CRON pour lancer le job chaque seconde avec uniquement des employés de types "sals_engineer"
vim pytechco-employee.nomad.hcl
nomad job run pytechco-employee.nomad.hcl

# Enfin supprimer les jobs
nomad job stop -purge pytechco-employee
nomad job stop -purge pytechco-web
nomad job stop -purge pytechco-redis
nomad job stop -purge pytechco-setup

# Arrêter le serveur nomad
Déploiement avec un serveur et plusieurs clients
On réutilise l'exécutable nomad installé précédemment.
Déployer Nomad en tant que service
sudo useradd --system --home /etc/nomad.d --shell /bin/false nomad
sudo mkdir --parents /opt/nomad /etc/nomad.d
sudo chown -R nomad /opt/nomad
Créer la configuration commune serveur et clients
# File: /etc/nomad.d/nomad.hcl
datacenter = "dc1"
data_dir = "/opt/nomad"
Créer la configuration serveur
# File /etc/nomad.d/server.hcl
bind_addr = "ip.du.ser.veur"
server {
  enabled          = true
  bootstrap_expect = 1
}
Créer la configuration clients
# /etc/nomad.d/client.hcl
client {
  enabled = true
   server_join{
      retry_join = ["ip.du.ser.veur"] # IP du serveur NOMAD
   }
}
Créer le service systemd sur le serveur et chaque client
# File: /etc/systemd/system/nomad.service

[Unit]
Description=Nomad
Documentation=https://www.nomadproject.io/docs/
Wants=network-online.target
After=network-online.target

# When using Nomad with Consul it is not necessary to start Consul first. These
# lines start Consul before Nomad as an optimization to avoid Nomad logging
# that Consul is unavailable at startup.
#Wants=consul.service
#After=consul.service

[Service]

# Nomad server should be run as the nomad user. Nomad clients
# should be run as root
User=nomad
Group=nomad

ExecReload=/bin/kill -HUP $MAINPID
ExecStart=/usr/local/bin/nomad agent -config /etc/nomad.d
KillMode=process
KillSignal=SIGINT
LimitNOFILE=65536
LimitNPROC=infinity
Restart=on-failure
RestartSec=2

## Configure unit start rate limiting. Units which are started more than
## *burst* times within an *interval* time span are not permitted to start any
## more. Use `StartLimitIntervalSec` or `StartLimitInterval` (depending on
## systemd version) to configure the checking interval and `StartLimitBurst`
## to configure how many starts per interval are allowed. The values in the
## commented lines are defaults.

# StartLimitBurst = 5

## StartLimitIntervalSec is used for systemd versions >= 230
# StartLimitIntervalSec = 10s

## StartLimitInterval is used for systemd versions < 230
# StartLimitInterval = 10s

TasksMax=infinity
OOMScoreAdjust=-1000

[Install]
WantedBy=multi-user.target
Démarrer le service, sur le serveur puis les clients
sudo systemctl enable nomad
sudo systemctl start nomad
sudo systemctl status nomad
Vérifier dans l'interface de Nomad
Exporter la nouvelle adresse du serveur
export NOMAD_ADDR=ip.du.ser.veur:4646
Déploiement d’un Conteneur Docker
Objectif : Déployer une application web Nginx avec Nomad.
# Fichier : nginx.hcl
job "nginx" {
  group "web" {
    network {
      port "web" {
        static = 80
      }
    }

    task "nginx" {
      driver = "docker"
      config {
        image = "nginx:latest"
      }
    }
  }
}
Commandes :
nomad job run nginx.hcl  # Déploiement
nomad job status nginx     # Vérification
Faire un scaling Horizontal
Objectif : Passer de 1 à 3 instances de Nginx.
# Modifier le fichier nginx.hcl
group "web" {
  count = 2
  ...
}
nomad job plan nginx.hcl  # Voir les changements
nomad job run nginx.nomad   # Appliquer